Stable Diffusion Image Generator
Version 4.0
Table of Contents
1. Installing Stable Diffusion AUTOMATIC1111
1. 2. MacBook Installation (Apple Silicon)
2. Start Stable Diffusion AUTOMATIC1111
3. Enabling Stable Diffusion AUTOMATIC1111 Web API
4. Using Stable Diffusion Image Generator App
4.3. Load subjects and prompts
4.4. Add models for image generation
4.5. Add subjects for image generation
4.6. Add prompts for image generation
5. Exploring On-Screen Options
6. Loading Custom Subjects and Prompts
Welcome to Stable Diffusion Image Generator application, the AI-powered image generator that lets you turn your ideas into stunning visuals. This user guide will walk you through the process of installing Stable Diffusion AUTOMATIC1111, enabling the Web API, and using the app’s functions.
1. Installing Stable Diffusion AUTOMATIC1111
1. 1. Windows Installation
To use Stable Diffusion on Windows, visit https://stable-diffusion-art.com/install-windows and follow the instructions provided to set up Stable Diffusion on your computer.
1. 2. MacBook Installation (Apple Silicon)
For use Stable Diffusion on macOS, visit https://stable-diffusion-art.com/install-mac and follow the instructions provided to set up Stable Diffusion on your MacBook.
1. 3. Download models
You can explore models that suit your preferences on the https://civitai.com website. Once you find models you’re interested in, download and add them to your Stable Diffusion AUTOMATIC1111. This will enable you to utilize these models for your image generation needs.
2. Start Stable Diffusion AUTOMATIC1111
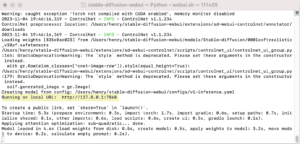
Once AUTOMATIC1111 is successfully installed and launched, a URL like the one below will be visible, and it can be entered into a web browser such as Internet Explorer, Google Chrome, or Firefox on Windows, or Safari on MacBook to access the image generation functions.
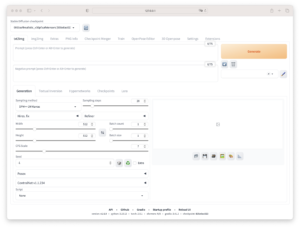
This is the main screen in a web browser, enabling users to pick a model, input a prompt, customize options, and commence the image generation process with a simple click on the “Generate” button. For a detailed understanding of available options and how to use them to create images tailored to your requirements, you can visit https://stable-diffusion-art.com/automatic1111/.
3. Enabling Stable Diffusion AUTOMATIC1111 Web API
To use Stable Diffusion Image Generator app, you need to enable the AUTOMATIC1111 Web API. Visit the official Web API documentation: https://github.com/AUTOMATIC1111/stable-diffusion-webui/wiki/API and follow the API setup instructions to enable the Web API.
4. Using Stable Diffusion Image Generator App
4.1. Getting started
When you open Stable Diffusion Image Generator app, you’ll find a user-friendly interface. Here’s how to get started:

4.2. Load models
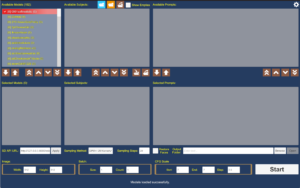
Please ensure the port number is correctly entered in the “SD API URL” text-box and then click the “Apply” button. The application will establish a connection with your AUTOMATIC1111 and populate the “Available Models” listbox, as depicted in the following image.
4.3. Load subjects and prompts
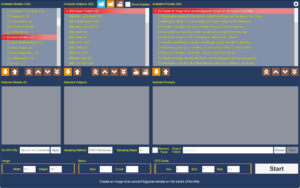
Now, select a model from the listbox, and then click the ![]() icon to load the default subjects and prompts. After doing so, the screen should appear as shown below.
icon to load the default subjects and prompts. After doing so, the screen should appear as shown below.
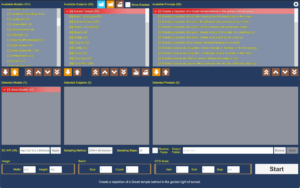
4.4. Add models for image generation
Now, click the ![]() icon located above the “Selected Models:” label on the left to move the currently selected model from the available models listbox above to the selected models listbox below, and then click on it in the selected models listbox below to choose it. After performing these steps, the screen should resemble the one shown below.
icon located above the “Selected Models:” label on the left to move the currently selected model from the available models listbox above to the selected models listbox below, and then click on it in the selected models listbox below to choose it. After performing these steps, the screen should resemble the one shown below.
4.5. Add subjects for image generation
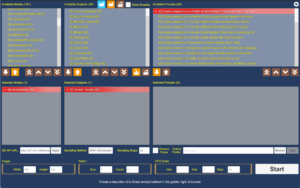
Now, click the ![]() icon located above the “Selected Subjects (0):” label on the middle to move the currently selected “Ancient Temple” subject from the available subjects listbox above to the selected subjects listbox below, and then click on it in the selected subjects listbox below to choose it. After performing these steps, the screen should resemble the one shown below.
icon located above the “Selected Subjects (0):” label on the middle to move the currently selected “Ancient Temple” subject from the available subjects listbox above to the selected subjects listbox below, and then click on it in the selected subjects listbox below to choose it. After performing these steps, the screen should resemble the one shown below.
4.6. Add prompts for image generation
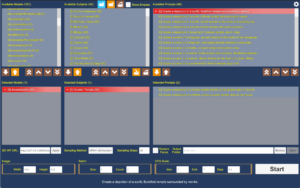
Now, click the ![]() icon located above the “Selected Prompts (0):” label on the right to move the currently selected “Create a depiction of a Greek temple…” prompt from the available prompts listbox above to the selected prompts listbox below. Next click the
icon located above the “Selected Prompts (0):” label on the right to move the currently selected “Create a depiction of a Greek temple…” prompt from the available prompts listbox above to the selected prompts listbox below. Next click the ![]() icon once more to move the “Create a depiction of a hidden…” prompt to the selected prompts listbox below as well. After these actions, the screen should appear as shown below.
icon once more to move the “Create a depiction of a hidden…” prompt to the selected prompts listbox below as well. After these actions, the screen should appear as shown below.
4.7. Set output folder
Now, click the “Browse” icon located above the “Start” button to open the standard folder dialog. Choose a folder and click the “Open” button to confirm. This selected folder will be used to store your generated images.
4.8. Start generating images
Now, leave the other options as default and click the “Start” button to begin the image generation process. The “Start” button will change to a “Pause” button. Please be patient and wait for the image generation process to complete. Once it’s finished, the “Pause” button will revert to the “Start” button. Then, click on the “Open” button located above the “Start” button to access your generated images.
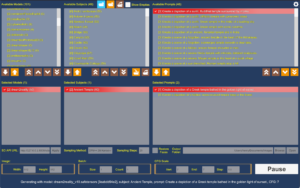
4.9. Explore generated images
Now, click the “Open” icon above the “Start” button to access the output folder and explore the images you’ve generated.
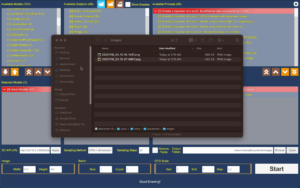
5. Exploring On-Screen Options
5.1. Available models
These are all the models available on your AUTOMATIC1111. As depicted in the second picture above, there are 102 models accessible on the AUTOMATIC1111. You have the flexibility to move any of these models to the selected models listbox below to facilitate image generation.
5.2. Selected models
The selected models are the ones (1) you need to move from the available listbox above in order to use them for image generation. In the listbox, each model entry consists of the following: first, the number of generated images associated with this model; next, the model’s name; and lastly, the count of subjects available for this model.
For instance, ![]() consider this image, which shows that no images have been generated yet, the model’s name is “dream2reality,” and it includes 50 subjects.
consider this image, which shows that no images have been generated yet, the model’s name is “dream2reality,” and it includes 50 subjects.
5.3. Model function icons
![]() Click this icon to add the currently selected model from the available models listbox above to the selected models listbox below for image generation. This icon is only active when subjects are loaded in the available subject listbox on the right. Ensure you load default subjects or provide your own subjects to a model before using it for image generation.
Click this icon to add the currently selected model from the available models listbox above to the selected models listbox below for image generation. This icon is only active when subjects are loaded in the available subject listbox on the right. Ensure you load default subjects or provide your own subjects to a model before using it for image generation.
![]() Click this icon to remove the currently selected model from the selected models listbox below and return it to the available models listbox above, excluding it from the image generation process.
Click this icon to remove the currently selected model from the selected models listbox below and return it to the available models listbox above, excluding it from the image generation process.
![]() Click this icon to move the currently selected model to the top in the selected models listbox below. This change in order determines that it will be used first in the image generation process before other models listed below it. This icon is only active if the currently selected model is not the first one in the selected models listbox below.
Click this icon to move the currently selected model to the top in the selected models listbox below. This change in order determines that it will be used first in the image generation process before other models listed below it. This icon is only active if the currently selected model is not the first one in the selected models listbox below.
![]() Click this icon to move the currently selected model up in the selected models listbox below. This change in order determines that it will be used earlier in the image generation process before other models listed below it. This icon is only active if the currently selected model is not the first one in the selected models listbox below.
Click this icon to move the currently selected model up in the selected models listbox below. This change in order determines that it will be used earlier in the image generation process before other models listed below it. This icon is only active if the currently selected model is not the first one in the selected models listbox below.
![]() Click this icon to move the currently selected model down in the selected models listbox below. This change in order determines that it will be used later in the image generation process after other models listed above it. This icon is only active if the currently selected model is not the last one in the selected models listbox below.
Click this icon to move the currently selected model down in the selected models listbox below. This change in order determines that it will be used later in the image generation process after other models listed above it. This icon is only active if the currently selected model is not the last one in the selected models listbox below.
![]() Click this icon to move the currently selected model to the bottom of the selected models listbox below. This change in order determines that it will be used last in the image generation process after other models listed above it. This icon is only active if the currently selected model is not the last one in the selected models listbox below.
Click this icon to move the currently selected model to the bottom of the selected models listbox below. This change in order determines that it will be used last in the image generation process after other models listed above it. This icon is only active if the currently selected model is not the last one in the selected models listbox below.
5.4. Available subjects
These subjects (49) belong to the currently selected model on the left. Each of these subjects has prompts available for generating images. You can move one or multiple subjects to the selected subjects listbox below for image generation.
![]() Click this icon to load default subjects and prompts.
Click this icon to load default subjects and prompts.
![]() Click this icon to load a file containing your subjects and prompts. These files are available in either Text format (*.txt) or ChatGPT format (*.gpt). You can find more details on the format of these files in the “6. Loading Custom Subjects and Prompts.”
Click this icon to load a file containing your subjects and prompts. These files are available in either Text format (*.txt) or ChatGPT format (*.gpt). You can find more details on the format of these files in the “6. Loading Custom Subjects and Prompts.”
![]() Click this icon to load the file containing your previously loaded subjects and prompts.
Click this icon to load the file containing your previously loaded subjects and prompts.
![]() Check this box to display empty subjects that have no associated prompts.
Check this box to display empty subjects that have no associated prompts.
5.5. Selected subjects
The selected subjects are the ones (1) you need to move from the available listbox above in order to use them for image generation. In the listbox, each subject entry consists of the following: first, the number of generated images associated with this subject; next, the subject itself; and lastly, the count of prompts available for this subject.
![]() For instance, consider this image, which shows that two images have been generated, the subject is “Ancient Temple” and it includes 50 prompts.
For instance, consider this image, which shows that two images have been generated, the subject is “Ancient Temple” and it includes 50 prompts.
5.6. Subject function icons
![]() Click this icon to move the currently selected subject from the available subjects listbox above into the selected subjects listbox below for image generation. This icon is exclusively functional when the presently selected subject is not empty. In other words, the subject must have at least one prompt loaded in the available prompts listbox on the right. Each default subject is consistently equipped with 50 prompts or more, ensuring that the icon is perpetually enabled. Hence, when loading your custom subject files, please make certain that each of your subjects contains at least one prompt. This condition needs to be met to enable the icon, thus allowing the subject to be utilized for image generation.
Click this icon to move the currently selected subject from the available subjects listbox above into the selected subjects listbox below for image generation. This icon is exclusively functional when the presently selected subject is not empty. In other words, the subject must have at least one prompt loaded in the available prompts listbox on the right. Each default subject is consistently equipped with 50 prompts or more, ensuring that the icon is perpetually enabled. Hence, when loading your custom subject files, please make certain that each of your subjects contains at least one prompt. This condition needs to be met to enable the icon, thus allowing the subject to be utilized for image generation.
![]() Click this icon to remove the currently selected subject from the selected subjects listbox below and return it to the available subjects listbox above, excluding it from the image generation process.
Click this icon to remove the currently selected subject from the selected subjects listbox below and return it to the available subjects listbox above, excluding it from the image generation process.
![]() Click this icon to move the currently selected subject to the top in the selected subjects listbox below. This change in order determines that it will be used first in the image generation process before other subjects listed below it. This icon is only active if the currently selected subject is not the first one in the selected subjects listbox below.
Click this icon to move the currently selected subject to the top in the selected subjects listbox below. This change in order determines that it will be used first in the image generation process before other subjects listed below it. This icon is only active if the currently selected subject is not the first one in the selected subjects listbox below.
![]() Click this icon to move the currently selected subject up in the selected subjects listbox below. This change in order determines that it will be used earlier in the image generation process before other subjects listed below it. This icon is only active if the currently selected subject is not the first one in the selected subjects listbox below.
Click this icon to move the currently selected subject up in the selected subjects listbox below. This change in order determines that it will be used earlier in the image generation process before other subjects listed below it. This icon is only active if the currently selected subject is not the first one in the selected subjects listbox below.
![]() Click this icon to move the currently selected subject down in the selected subjects listbox below. This change in order determines that it will be used later in the image generation process after other subjects listed above it. This icon is only active if the currently selected subject is not the last one in the selected subjects listbox below.
Click this icon to move the currently selected subject down in the selected subjects listbox below. This change in order determines that it will be used later in the image generation process after other subjects listed above it. This icon is only active if the currently selected subject is not the last one in the selected subjects listbox below.
![]() Click this icon to move the currently selected subject to the bottom of the selected subjects listbox below. This change in order determines that it will be used last in the image generation process after other subjects listed above it. This icon is only active if the currently selected subject is not the last one in the selected subjects listbox below.
Click this icon to move the currently selected subject to the bottom of the selected subjects listbox below. This change in order determines that it will be used last in the image generation process after other subjects listed above it. This icon is only active if the currently selected subject is not the last one in the selected subjects listbox below.
![]() Click this icon to save subjects in the selected subjects listbox. The saved subjects can then be loaded into the selected subjects listbox of other models.
Click this icon to save subjects in the selected subjects listbox. The saved subjects can then be loaded into the selected subjects listbox of other models.
![]() Click this icon to load the saved subjects into the selected subjects listbox of the currently selected model enabling their use for image generation.
Click this icon to load the saved subjects into the selected subjects listbox of the currently selected model enabling their use for image generation.
5.7. Available prompts
These prompts (48) belong to the currently selected subject and available for generating images. You can move one or multiple prompts to the selected prompts listbox below for image generation.
5.8. Selected prompts
The selected prompts are the ones (2) you need to move from the available listbox above in order to use them for image generation. In the listbox, each prompt entry consists of the number of generated images associated with this prompt and the prompt itself.
![]() For instance, consider this image, which shows that one image has been generated, the prompt is “Create a depiction of a hidden…”.
For instance, consider this image, which shows that one image has been generated, the prompt is “Create a depiction of a hidden…”.
5.9. Prompt function icons
![]() Click this icon to move the currently selected prompt from the available prompts listbox above into the selected prompts listbox below for image generation.
Click this icon to move the currently selected prompt from the available prompts listbox above into the selected prompts listbox below for image generation.
![]() Click this icon to remove the currently selected prompt from the selected prompts listbox below and return it to the available prompts listbox above, excluding it from the image generation process.
Click this icon to remove the currently selected prompt from the selected prompts listbox below and return it to the available prompts listbox above, excluding it from the image generation process.
![]() Click this icon to move the currently selected prompt to the top in the selected prompts listbox below. This change in order determines that it will be used first in the image generation process before other prompts listed below it. This icon is only active if the currently selected prompt is not the first one in the selected prompts listbox below.
Click this icon to move the currently selected prompt to the top in the selected prompts listbox below. This change in order determines that it will be used first in the image generation process before other prompts listed below it. This icon is only active if the currently selected prompt is not the first one in the selected prompts listbox below.
![]() Click this icon to move the currently selected prompt up in the selected prompts listbox below. This change in order determines that it will be used earlier in the image generation process before other prompts listed below it. This icon is only active if the currently selected prompt is not the first one in the selected prompts listbox below.
Click this icon to move the currently selected prompt up in the selected prompts listbox below. This change in order determines that it will be used earlier in the image generation process before other prompts listed below it. This icon is only active if the currently selected prompt is not the first one in the selected prompts listbox below.
![]() Click this icon to move the currently selected prompt down in the selected prompts listbox below. This change in order determines that it will be used later in the image generation process after other prompts listed above it. This icon is only active if the currently selected prompt is not the last one in the selected prompts listbox below.
Click this icon to move the currently selected prompt down in the selected prompts listbox below. This change in order determines that it will be used later in the image generation process after other prompts listed above it. This icon is only active if the currently selected prompt is not the last one in the selected prompts listbox below.
![]() Click this icon to move the currently selected prompt to the bottom of the selected prompts listbox below. This change in order determines that it will be used last in the image generation process after other prompts listed above it. This icon is only active if the currently selected prompt is not the last one in the selected prompts listbox below.
Click this icon to move the currently selected prompt to the bottom of the selected prompts listbox below. This change in order determines that it will be used last in the image generation process after other prompts listed above it. This icon is only active if the currently selected prompt is not the last one in the selected prompts listbox below.
5.10. SD API URL
This is the API URL for your Stable Diffusion AUTOMATIC1111, which provides access to the API functions required for generating your images. Click the “Apply” button to initiate the connection to your AUTOMATIC1111, will then populate the “Available Models” listbox and the “Sampling Method” dropdown for use in image generation.
5.11. Sampling method
This is the list of sampling methods from your Stable Diffusion AUTOMATIC1111. Choose one to use for your image generation.
5.12. Sampling steps
This is the number of steps used with the sampling method for your image generation.
5.13. Restore faces
Check this option if you want to apply “Restore Faces” feature to your image generation.
5.14. Output folder
This is the output folder where generated images are stored. Click the “Browse” button to designate the output folder. Use the “Open” button to access your generated images in the output directory.
5.15. Image width and height
This corresponds to the width and height of your output images.
5.16. Batch size and count
This is the batch size and count used for your image generation.
5.17. CFG start, end and step
These are the parameters for the CFG scale used in your image generation. The process starts at the “start” value and proceeds in increments defined by the “step” until it reaches the “end” value to generate images.
5.18. Start
Click this button to start or pause your image generation process.
5.19. Setting
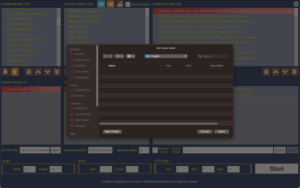
Click the button at the top-right corner to open the Settings dialog, displayed as shown below.
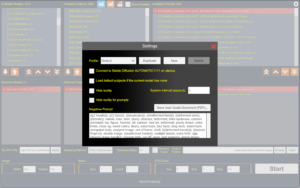
- Purchase Pro Version:
If this button is visible, it indicates that you are using the free version of the app, which generates images with a “www.ttv-solutions.com” watermark at the center. Click this button to upgrade to the “Pro” version of the app, which generates watermark-free images.
- Purchase Pro Version:
Restore Purchase:
If this button is also visible, it indicates that you are using the free version of the app, which adds a “www.ttv-solutions.com” watermark at the center of the images. Click this button to enable the “Pro” version of the app, which generates watermark-free images if you’ve already made the purchase.
Profile:
By default, the options you set on the main screen and this dialog are saved under the “Default” profile. To create a copy of the currently selected profile, click the “Duplicate” button. Use the “New” button to create a new profile or select the “Delete” button to delete the currently chosen profile from the dropdown. This allows you to have various profiles tailored for different image generation scenarios.
Connect to Stable Diffusion AUTOMATIC1111 on startup:
Enable this option if you want the app to automatically connect to your Stable Diffusion AUTOMATIC1111 upon startup and load the profile you were working on during your last session.
Load default subjects if the current model has none:
Enable this option if you want the app to automatically load default subjects and prompts when you select a model from the “Available Models” listbox on the left, and that selected model doesn’t have associated subjects.
Hide Tooltip:
Enable this option if you want to hide tooltips for all widgets, except when selecting a prompt from the “Available Prompts” or “Selected Prompts” list-boxes on the main screen.
System interval (second):
This is for internal use or troubleshooting purposes only.
Hide tooltip for prompts:
Enable this option if you want to hide tooltip when selecting a prompt from the “Available Prompts” or “Selected Prompts” list-boxes on the main screen.
Negative Prompt:
This is the negative prompt used in the image generation process.
6. Loading Custom Subjects and Prompts
As mention earlier, you can click the ![]() icon to load a file containing your subjects and prompts. These files are available in either Text format (*.txt) or ChatGPT format (*.gpt). Here are samples of these formats.
icon to load a file containing your subjects and prompts. These files are available in either Text format (*.txt) or ChatGPT format (*.gpt). Here are samples of these formats.
6.1. Text Format (*.txt)
The example below displays the contents of the my_subjects.txt file, which contains three subjects. The first is “Balloon” with two associated prompts. The second is “Beach” with four prompts, and the last is “Bridge” with three prompts.
[Balloon]
Create an image of a colorful hot air balloon ascending against a blue sky.
Generate a scene of a hot air balloon festival with a multitude of balloons.
[Beach]
Generate an image of a tranquil beach at sunset with soft, warm colors and gentle waves.
Create a picturesque beach scene with palm trees, a hammock, and a crystal-clear turquoise sea.
Design an artistic representation of a beach in a vibrant and abstract style, using bold colors and dynamic shapes.
Generate an image of a crowded, bustling beach on a sunny day, capturing the energy and excitement of the scene.
[Bridge]
Create an image of a classic, arched stone bridge over a tranquil river.
Generate a scene of a modern, steel suspension bridge against a city skyline.
Design an image of a quaint, covered wooden bridge in a rural setting.
6.2. ChatGPT Format (*.GPT)
To enable ChatGPT to generate subjects and prompts for use with Stable Diffusion, you should provide some foundational information about Stable Diffusion. We’ve included what we provided to ChatGPT as a reference, and you can use it as is or customize it to your preference.
User
Do you know about Generative AI?
ChatGPT
Yes, I’m familiar with generative AI. Generative AI refers to a class of artificial intelligence systems and models designed to generate data, often in the form of text, images, audio, or other types of content. These models are capable of creating new content that is similar to existing data they have been trained on.
One of the most notable advances in generative AI has been the development of generative models based on neural networks, particularly variants of deep learning models like GANs (Generative Adversarial Networks) and autoencoders. These models have been used for various creative tasks, such as:
Text Generation: Models like GPT (Generative Pre-trained Transformer) can generate coherent and contextually relevant text, making them useful for applications like chatbots, content generation, and even writing assistance.
Image Generation: GANs, for example, have been used to generate realistic images, artwork, and even deepfake videos.
Music and Audio Generation: Generative models can also produce music compositions, sound effects, and spoken language with natural intonation and pronunciation.
Data Augmentation: Generative models can be used to augment datasets for machine learning tasks by generating additional synthetic data to enhance training.
Style Transfer: Some generative models are capable of transferring the style or characteristics of one piece of content (e.g., an art style) to another, resulting in creative and novel outputs.
Generative AI has found applications in various fields, including creative arts, content generation, data augmentation, and more. However, it also raises ethical concerns, especially in the context of deepfake generation and the potential for misuse. Researchers and practitioners are continually working on improving the capabilities and understanding the implications of generative AI technologies.
User
Do you Understand Prompts for AI Image Generation
ChatGPT
Yes, I can understand prompts for AI image generation and provide guidance on how to use them effectively with generative models like GANs (Generative Adversarial Networks) or other image generation techniques. When working with AI image generation, here are some key considerations for crafting effective prompts:
Clarity and Specificity: Be clear and specific about what you want in the generated image. Describe the desired content, style, or any specific elements you want to include. The more precise your prompt, the better the chances of getting the desired output.
Size and Format: Specify the size and format of the image you need. For example, you can request an image in a particular resolution (e.g., 1080×1920 pixels) or format (e.g., JPEG or PNG).
Context and Constraints: Provide context if necessary. If you have certain constraints or requirements, such as a specific theme, color scheme, or mood, make sure to include them in your prompt.
References: If you have reference images or examples that illustrate what you want, you can mention them or provide links. This can help the model better understand your vision.
Iterations and Feedback: It’s often a good practice to ask for multiple iterations or variations of the generated image. You can request the model to refine or adjust the image based on your feedback.
Prompt Structure: Consider the structure of your prompt. You can use natural language to describe what you want, or you can use a more structured approach, such as providing keywords or a sentence template.
Experiment: Don’t hesitate to experiment with different prompts to see what works best. Small variations in your prompt can lead to significantly different results.
Pre-trained Models: Depending on the platform or AI tool you’re using, you might have access to different pre-trained models. Experiment with different models to see which one aligns best with your image generation needs.
Patience: Keep in mind that AI image generation can sometimes produce unexpected results. Be patient and open to adjustments until you get the image you’re satisfied with.
Ethical Considerations: Be aware of ethical considerations when using AI for image generation, especially if your use case involves sensitive or potentially harmful content.
Remember that the effectiveness of your prompt also depends on the capabilities and limitations of the specific AI model you are using. Experimentation and refining your approach over time can help you achieve better results in generating images that match your requirements.
User
There is a software named DreamStudio which uses the Stable Diffusion (SD) which is a powerful AI image generator that can create images from a text prompt. I can produce output using various descriptive text inputs like style, frame, or presets. In addition to creating images, Stable Diffusion can add or replace parts of images thanks to inpainting and extending the size of an image, called outpainting. I can edit a generative or uploaded image, whether the image was created with AI or not. and the following is the advice from an experience person about the Stable Diffusion, are you ready to help to generate prompts?: Before creating images with DreamStudio, we’d be remiss if we didn’t explain how to make the best prompts for Stable Diffusion image creation. After all, prompts are a crucial component of the image generation process. First, it’s important to know that a prompt consists of three main parts: frame, subject, and style. The frame defines the size and composition of the image. In contrast, the subject describes the object or objects of the picture. Finally, the style specifies the visual characteristics of the image. Examples of style could be famous artists such as Pablo Picasso or Ansel Adams, an art style or medium like acrylic or oil painting, line art, etc., or descriptive text such as the angle and composition. For example, we asked DreamStudio to generate an image of a Goldendoodle and Nova Scotia duck tolling retriever in a photorealistic, over-the-shoulder view. Next is the Stable Diffusion example Tips For Creating Effective Prompts To create effective prompts in Stable Diffusion, it’s important to be specific about what you want. Be sure to provide clear instructions for each prompt component (frame, subject, and style), and above all else, be descriptive. Use Keywords As a good rule of thumb, try to incorporate as many of these keywords as possible:
Subject: What you want to see in an image (example: mountain, cat, car, etc.)
Medium: the material used, such as digital painting, illustration, photography, etc.
Style: This refers to the artistic style desired, such as impressionist, realism, hyperrealistic, etc.
Artist: Name a specific famous artist, such as Rembrandt, Picasso, etc.
Resolution: infers how sharp and detailed an image is. Use words such as highly detailed, ultrarealistic, etc.
Additional details: Add in additional descriptors (modifiers) to enhance an image
Color: Add colors to guide SD to create images of a certain color or tone, such as light blue, deep red, etc.
Lighting: Add lighting effects through keywords like cinematic lighting, dark, etc.
Add Negative Prompts In addition to keywords, you can use negative prompts to steer SD in the right direction. Negative prompts are aspects you don’t want to see in your generative output. This is a great way to omit unwanted elements in your images. For example, we used this prompt in DreamStudio, along with this negative prompt to leave out things we didn’t want to see: Prompt:
an image of a Goldendoodle in a photorealistic, over-the-shoulder view. Add detailed grass, a lake, and mountains in the foreground. Add cinematic lighting, high detail, and sharp focus. Negative Prompt:
extra limbs, disfigured, deformed, body out of frame, bad anatomy, watermark, signature, cut off, low contrast, underexposed, overexposed, bad art, beginner, amateur, distorted face, blurry, draft, grainy.
ChatGPT
Certainly, I can help you generate prompts for Stable Diffusion image creation based on the advice you provided. Here’s a prompt example along with the breakdown of the frame, subject, and style components:
Prompt Example:
Generate an image of [Subject] in a [Frame] style, resembling [Style]. Ensure [Additional Details] are incorporated, and avoid any elements mentioned in the Negative Prompt.
Now, let’s break down each component:
Subject: This is what you want to see in the image. You can replace “[Subject]” with your desired object or scene. For example, if you want an image of a serene mountain landscape, you would replace “[Subject]” with “a serene mountain landscape.”
Frame: This part defines the size and composition of the image. You can specify the framing of the image here. For example, if you want a close-up view of the mountain landscape, you can say “a close-up view of [Subject].”
Style: Specify the artistic style you desire for the image. Replace “[Style]” with your preferred style. For instance, if you want the image to resemble the impressionist style of Monet, you can say “resembling Monet’s impressionist style.”
Additional Details: Mention any specific details or modifiers you want to enhance the image. For example, you can say “Add [Additional Details] such as a vivid sunset, lush greenery, and a serene lake.”
Negative Prompt: This is where you specify elements you do not want in the image. You can use the provided list of negative prompts as a reference and include any that are relevant to your request. For example, if you want to avoid any distorted faces or grainy textures, you can add “avoid distorted faces and grainy textures” to the negative prompt section.
Putting it all together:
Prompt Example (Complete):
Generate an image of a serene mountain landscape in a close-up view style, resembling Monet’s impressionist style. Add vivid sunset, lush greenery, and a serene lake. Avoid distorted faces and grainy textures.
Feel free to adapt this template to your specific image generation needs by replacing the placeholders with your desired subjects, frames, styles, and additional details. This should help you create effective prompts for Stable Diffusion image generation.
User
OK, I’m developing a software which will call the API of the Stable Diffusion to generate images. The software will show a list of subjects like tree, forest, beach, see, sky, street, city, etc. Can you guide me a way to have different prompts when users select one of subjects?
ChatGPT
Certainly, I can provide guidance on how to generate different prompts based on user-selected subjects in your software. You can create a dynamic system that generates prompts by combining user-selected subjects with other relevant details. Here’s a step-by-step approach:
Create a Subject List: As you mentioned, you will have a list of subjects like “tree,” “forest,” “beach,” etc. Ensure that this list is easily accessible within your software.
Define Prompt Templates: Create a set of prompt templates, each designed for a specific subject. These templates will serve as the basis for generating prompts. Each template should include placeholders for the subject, frame, style, and any additional details.
User Selection: When a user selects a subject from your list (e.g., “beach”), your software should associate that subject with the corresponding prompt template designed for it.
Prompt Generation: Combine the selected subject with the associated prompt template to generate a complete prompt. For example:
If the user selects “beach,” your software can use the “beach” prompt template to generate a prompt like: “Generate an image of a serene beach scene in a picturesque style, resembling [Style].”
If the user selects “tree,” the software can use the “tree” prompt template to generate a prompt like: “Create an image featuring a lush tree in a [Frame] style, with attention to [Additional Details].”
Customization: Allow users to further customize prompts by specifying frame, style, and additional details if desired. You can provide input fields or options for these components.
Preview: Provide users with a preview of the generated prompt so they can review and make adjustments if necessary.
API Call: When the user is satisfied with the generated prompt, your software can make an API call to Stable Diffusion using the prompt as input to generate the desired image.
Repeat for Other Subjects: Repeat this process for each subject in your list, ensuring that you have a corresponding prompt template for each one.
By following this approach, you can dynamically generate prompts based on user-selected subjects while ensuring that the prompts are clear, relevant, and suitable for image generation using the Stable Diffusion API. This allows users to have a more tailored experience when generating images in your software.
Now you can ask the ChatGPT generate subjects and prompts. The example below displays the contents of the my_subjects.gpt file, which contains three subjects. The first is “Beach” with five (2+3) associated prompts. The second is “Forest” with ten (5+2+3) prompts, and the last is “Mountain” with six prompts.
User
Can you help to provide 3 subjects?
ChatGPT
Certainly, here’s a list of 3 subjects that you can consider including in your software for generating prompts:
Beach
Forest
Mountain
These subjects cover a wide range of natural and man-made settings, and users can select from this list to generate prompts for creating various types of images using your software with Stable Diffusion.
User
Can you help to generate 2 prompts for the Beach subject?
ChatGPT
Certainly, here are 2 prompts for the “Beach” subject:
Generate an image of a tranquil beach at sunset with soft, warm colors and gentle waves.
Create a picturesque beach scene with palm trees, a hammock, and a crystal-clear turquoise sea.
User
Another 3 please?
ChatGPT
Certainly, here are 3 more prompts for the “Beach” subject:
Create a minimalist representation of a beach at sunrise, focusing on the silhouettes of palm trees and seagulls against a pastel-colored sky.
Generate an image of a hidden, secluded beach accessible only by a narrow, winding path through the lush jungle.
Design a surreal beach scene with floating islands, bioluminescent creatures, and a dreamlike atmosphere.
User
Can you help to generate 5 prompts for the Forest subject?
ChatGPT
Certainly, here are 5 prompts for the “Forest” subject:
Generate an image of a dense, ancient forest with towering redwood trees and a misty, enchanted atmosphere.
Create a surreal forest scene with bioluminescent flora and fauna, casting an otherworldly glow.
Design an image of a sun-dappled forest clearing with a sparkling stream, wildflowers, and playful woodland creatures.
Generate a dark and mysterious forest at night, illuminated only by the soft glow of fireflies and distant stars.
Create an image of an autumn forest with vibrant foliage in shades of red, orange, and gold.
User
Another 2 please?
ChatGPT
Certainly, here are 2 more prompts for the “Forest” subject:
Create an image of a misty forest with ancient ruins peeking through the trees, evoking a sense of mystery and history.
Generate a magical forest where the trees have colorful, swirling patterns and leaves that change colors with the wind.
User
Another 3 please?
ChatGPT
Certainly, here are 3 more prompts for the “Forest” subject:
Create an image of a fantasy forest with talking animals, mythical creatures, and ancient, enchanted trees.
Generate a forest scene with a hidden, mystical portal that leads to another realm or dimension.
Design an image of a forest during a vibrant, colorful autumn sunset, with the sky ablaze in hues of orange, red, and purple.
User
Can you help to generate 6 prompts for the Mountain subject?
ChatGPT
Certainly, here are 6 prompts for the “Mountain” subject:
Generate an image of a majestic mountain range at sunrise, with the first light casting a warm glow on the peaks.
Create a dramatic mountain landscape with rugged cliffs, cascading waterfalls, and swirling mist in the valleys below.
Design an image of a tranquil mountain lake nestled between towering peaks, reflecting the surrounding scenery.
Generate a surreal mountain scene with floating islands, mystical creatures, and an otherworldly atmosphere.
Create an image of a snow-covered mountain peak in the heart of winter, with glistening ice and pristine snowdrifts.
Design a futuristic mountain city perched on the slopes, blending advanced technology with natural beauty.
Please note that when asking ChatGPT for assistance, your questions should follow one of these three formats:
1. Can you help to provide “x” subjects?
2. Can you help to generate “y” prompts for the “s” subject?
3. Another “z” please?
In these formats, “x,” “y,” and “z” should be numerical values, and “s” is a string representing the subject for which you want ChatGPT to generate prompts. The “s” subject can be any subject, even if it’s not in the initial list of subjects generated by ChatGPT in response to your first question.
Click here to download the free version of the Stable Diffusion Image Generator app and enjoy generating thousands of images with just one click. Explore and discover your images effortlessly.